Friday, February 6, 2015

The Storm Coast Map

Welcome to the Storm Coast where it LITERALLY always rains. This area is also pretty easy. Its a bit bigger than the Fallow Mire, but still really easy. Go ahead and level up. This will be the last "fairly easy" area to be had in the game (aside from the dragon held in the area.)


Be warned that after exploring a bit you WILL encounter an ugly-*** giant and a high dragon fighting. There ARE things for you to do in that area. Be careful. The giant will kill you if you aren't a high enough level and the dragon will fly off. DON'T GO AFTER THE DRAGON.  


1) Holding the Storm Coast (straightforward)


Make sure that you make and equip this necklace before you go to the bandit camp. They are the agents you can recruit on this map.


Once it is equipped the bandits will leave  you alone and you can walk in and duel the leader (and two dogs) to the death. After the fight, either you've killed all the Blades of Hessarian OR they'll be your agents on the map. 


There are 4 signs to find scattered through the map. It isn't really that hard to find them if you use the whole"click in your left stick" thing that I've been on you about. If you have Blackwall in your party then you get MAJOR boosts of approval with him while finding these. 


There are four tunnels to seal. They're not all that hard to do either. 2 are in caves (along with deepstalkers and spiders) 1 is on the side of a mountain and the other is by the waterfall in the southernmost part of the map (along with demons and spiders).


This one you have to wait for the operation to pop up on your war-table because the entrance is a dwarven ruin that needs to be cleared. When its done, its pretty easy to finish. At the end of the path here is how you get to the dragon. I don't recommend you taking on said dragon till you reach like a level 19.


Okay, as far as dragons go DO NOT in NO WAY take on this one till you are AT LEAST a level 20!!! I know it says 15+ but you WILL die. It will kill you in seconds. It is the HARDEST one to defeat (including the ones that are supposedly level 19+)


On top of the aforementioned 6 quests there are also the collector quests to do. 

1) Astrariums


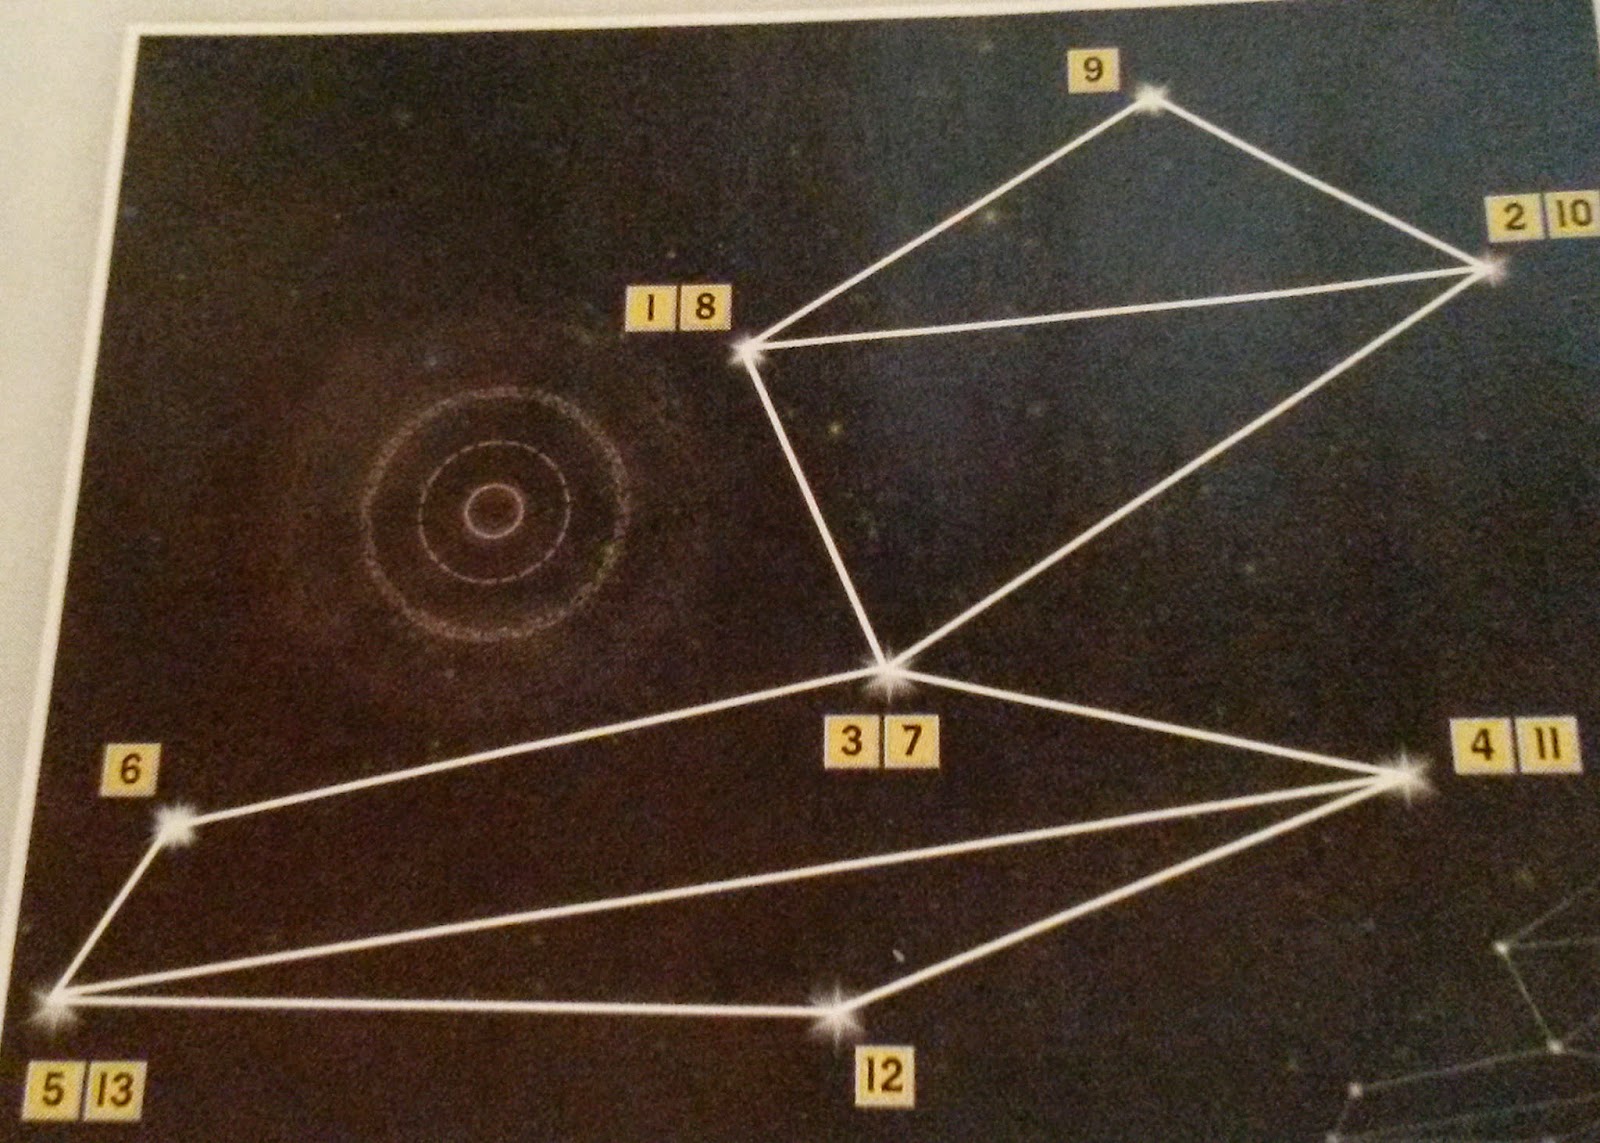
As you can see there are three to find and complete.

2) Bottles of Thedas

There are 2 bottles to find and they are virtually in the same area. 

3) Solas Artifacts

2; one in the locked Dwarven Ruin and the other by the rift in the waterfall area

4) Landmarks

There are 5 to find

5) Glyphs

The only one to find is inside the waterfall cave in the back and to the left.

6) Oculara 

4 skulls to find with 13 shards

7) Song Lyrics

To find this find the bottles. It is in the middle of the two.

8) Crafting 

There are two logging stands and a quarry to be found

9) Rifts

There are three on the map

The Fallow Mire Map


Okay, so as far as hard maps goes......this one is a breeze. As you've probably noticed (if you've been following me so far) you're not quite ready to venture into those red areas on the Hinterlands map. SO this map gives you a MUCH needed push to gain the levels you need for those areas (except the dragons'; that one is a BEAST! <-rofl pun intended ^-^) So the only tip I am going to give you for this level is that you are REALLY going to want the "Deft Hands, Fine Tools" Inquisition perk. It will help you get part of Blackwalls approval quest as well as a mosaic piece for the Freed are Slaves set. Also, bring a mage.

After your initial conversation with Harding the map is now open to you. Immediately go the house just across the path from your base-camp to grab a codex, some loot AND a bottle for the "Bottles of Thedas/Bottles on the Wall" quest. Now you can start on the map.


You have two bottles (really only one because you should've gotten the other right-off-the-bat.) There are 4 landmarks 4 glyphs, 1 mosaic piece, 1 rift, 1 camp to establish and 1 agent to collect on this map if you are interested.


1) Holding the Mire (pretty straightforward)

2) Lost Souls 
This encompasses the entirety of the map, but it is rather easy. At the very end of the bog lies a decript old castle thing. Hiding in the back part (past all the undead and some Avvar tribesman) is the leader you are going to have to defeat to rescue said soldiers that have been missing. The fight isn't too hard. There'll be a warrior and an archer in additon to the leader to fight. Concentrate on picking them off before you go for the big kahuna though. Once he is dead (looking at the broken throne from the enterance) there is Blackwalls' Grey Warden artifact to the right and the missing scouts to the left; both towards the back of the space. After getting these make your way out to where the tribesman were surrounding the fire and meet your agent. He wants to join you. 


This isn't too hard. It goes hand-in-hand with Beneath the Mire. There are four stations scattered on the path leading you to the end of the map, Defeat the demons. (Less undead appear that way.)


This isn't too hard. It goes hand-in-hand with Beacons in the Dark. After lighting the veilfire and defeating the demons and undead that come your way, light a torch with the veilfire and then go around the the other side of the post to see a rune illuminate. There are four, all on the posts you have to light anyway. 


This is pretty easy. After the 3rd station of defeating the demons and veilfire walk up to where two Avvar tribesman await you. There will be a pond on the right. Go across it and your HUD screen should be pulsing orange. Look for the key and then open up the house that lies behind the spot that you found the key in. 


Not going to lie, finding the entrance to this was freaking irritating. I had to set the controller down for fear of breaking it. So in order to get to the ONE rift (not the one you have to open for Sky Watcher) defeat the 3rd station and then go down the small slope and immediately to your right. There should be an opening in the rock (looks like an arch from Stonehenge) go through, close the rift, grab the landmark go straight (facing the landmark). You should find an arch hidden (to me) away. Go through it. It should lead to a small clearing. Ignore the mass of undead rising from the depths and turn to the right to go through another archway that leads to the area of "Hidden Apostate Camp". Widris, the person you seek, awaits you here. After defeating all that lie there, activate the Solas artifact that is here. Voila! You're done. 


The green area is where the most difficult landmark is located. You might have to trudge through a lot of water (and undead) in order to get there however. The pink area is where Widris is. The red area is where Cabin Fever is located (sometimes hard to find unless you know what you are looking for.The aqua area is where the 2nd bottle for "Bottles of Thedas/Bottles on the Wall" lies. Lastly the pumpkin-y color is where the mosaic piece and the 2nd part of Blackwalls quest is. Be warned you MUST have the "Deft Hands, Fine Tools" Inquisition perk (and a rogue) in order to access it as it is behind a locked door. 

Thursday, February 5, 2015

Hinterlands Map


Okay this map has a total of 43 quests. Yes you read that right 43 quests. 0.o HOLY CRAP! Luckily (since this map is the freaking biggest out of the whole game) I have divided it for your gaming pleasure.


The first area is the yellow. This holds the crossroads and the following quests (all of which I will link to the Dragon Age Wiki if you're having trouble.)

2) Apostates in the Witchwood (this is a recruit an agent quest)
3) Templars to the West (this is a recruit an agent quest)

The second area is the green. This holds the farmlands and Master Dennett. 

4) Farmland Security (this is a recruit an agent quest)
5) Trouble with Wolves (this is a recruit an agent quest)
7) Letter From a Lover (won't be able to complete until you unlock Emprise du Lion area)

The third area is the blue. This holds the mountain area:

1) In the Elements (this is a recruit an agent quest)
2) Hunger Pangs (this is a recruit an agent quest)
3) Praise the Herald of Andraste (this is a recruit an agent quest)
6) Love Waits (this is a recruit an agent quest)
8) Strange Bedfellows (this is a recruit an agent quest)
9) My Lovers Phylactery (this is a recruit an agent quest)

The last area is pink. This holds the village of redcliff and the apostate mages. 

1) A Healing Hand (Must be an elf or have Solas in your party to recruit the healer)
6) Business Arrangements (this is a recruit an agent quest)

Okay the red areas I would seriously leave these alone till you are a level 9 (or 8 if you're pushing it.) 

7) High Dragon: The Ferelden Frostback (seriously DO NOT attempt till you are a level 13+ and have a well rounded party with frost damage)


Lastly there are a series of miscellaneous quests that are unoffical but are fun (if you like collecting things) and they are all over the entire map.

1) The Fall Mosaic Pieces

I am linking a video here for this. It seriously goes into too much detail for me to simply blog about. 

2) Recruiting Agents for the Inquisition

There are 8. Some of which need your party members there to recruit them. 
Clemence: pink area-inside the pub
Enchanter Ellendra: yellow area- must find a dead templar in blue area tell her of it and have Vivenne in your party
Horsemaster Dennet: green area- must have Cassandra or Vivenne with you
Lord Berand: blue area- must've told him of the death of his lover
Ritts: blue area- must have Varric in your party and discover that she was involved with a mage (click in your left stick people!)
Speaker Anais: blue area- Tell her to spread word of the Inquisition after you close the rift 
Tanner: pink area- must discover a letter found on a dead templar that shes a smuggler and have Cassandra in your party
Corporal Vale: yellow area- must complete all the quests to benefit the refugees and tell him to grow the Inquisitions reputation

3) The Ocularum Shards

Every-time you see a skull pop up on your map, go check it out. There are 22 shards (i think) to be found on this map. They're separated in-between 5 skulls.

4) Landmarks

There are 19 landmarks to be found

5) Astrariums

3 on the map. One resides in the lower left-hand comer red; one in the blue; one in the green. You're going to want to do these as they lead to some pretty awesome loot. The solutions to these puzzles are underneath because I'm not that cruel.


6) Bottles of Thedas

There are 4 bottles on this map. One in green; one in blue; one in yellow; one in pink (Click in left stick and watch the HUD screen. If it pulses orange something is nearby.)

7) Song Lyrics 

(this one really is only inside the pub at Redcliff)

8) Treasure Maps

There are three in the map. Not going to spoil where. 
(Click in left stick and watch the HUD screen. If it pulses orange something is nearby.)

9) Solas Artifacts 

There is one in the green and the original is inside a cave inside the yellow area.

10) Glyphs 

One inside the green and the other is inside the yellow (only found with veilfire)

11) Holding the Hinterlands

Just establish 6 camps throughout the area

12) The Rifts

There are a total of 12( I think) to close

13) Logging Stands

Believe me you are going to want to get these. There are two: one in the red (lower left hand corner) the other in the yellow by Lake Luthias.

Gathering a Gaggle of Compaions

Okay, we've covered the Haven map and the Prologue. Here is where it gets rather tricky. You have four more companions that you can (tis optional) to recruit before you really get into the nitty gritty of the story-line. Upon the completion of Haven (where we last left off) the war council decides to send you to the Hinterlands (now remember from DA:Origins this is where Redcliff is.) You have to select the option to travel there from the war-table and after a small convo with Scout Harding you can go explore the map of the Hinterlands (arguably the BIGGEST map of the ENTIRE game.)

Before you get side-tracked though. Fight through some templars and mages to find Mother Giselle down by the crossroads and have the conversation with her.


Mother Giselle

Now you have the option of 42 quests and a ton of space to explore. 0.o <- my face when I first did the playthrough. Holy crap! That is a whole ****-ton of quests in one area. (Totally just censored myself there. Woo!) Like I have said before I do not claim to be the best or most amazing at this game. I just know my stuff.

To make life easier I go up to the let and a small hill to find Corporal Vale and find out everything from him (literally I exhaust every possible talking option.) I then meander around the crossroads area and talk to everyone who might have a quest there. When this is over I make my way into the Witchwood area of the map to find the Mage Stronghold. It looks like this:


Defeat the mages inside. Voila you now have 2 power to put towards your goal of 8. (4 for Val Royeaux and 4 to unlock the Storm Coast.) Now you are going to have to book it to where the Templars are holding out. Seriously a big pain since its on a different side of the map. Turn around and go past Fort Conner and keep going to the right till you reach a broken wood bridge. Now turn left. You'll find a small hill. Go that way and up the hill to find the Templars. It looks like this:


Going up the hill you'll encounter two templars right off the bat; both of which have shields. This is where a rogue (either you or Varric at this point) comes in handy. They get damage bonuses for flanking attacks. (Woo!!) Once they are defeated continue up the path and get all those baddies up there. (+2 power) Upon completion go back down the way you came from and across the broken wooden bridge. Stick to the left side once across and eventually you'll go up a hill and get to an open area (after the large hill disappears). This is the farmlands. Establish a camp by the side of a pond and then go speak to Horse-master Dennett. 


He'll tell you that if you want horses that you're going to have to do tasks for him and to speak with two people milling about the house (one is the garden just outside the house he is in <- his wife; the other is in an armory thing at the bottom of the hill leading up to the house.) BUT he'll give you a horse. Now you don't have to walk everywhere. Woo!! After you're done exploring where he is (there is some loot and a bottle hiding away for the Bottles on the Wall quest; click in your left stick peeps!) Go down to the corral where your horse is waiting next to Dennets daughter Sienna. She has a series of three races that she puts you through (optional). After getting your horse go back to Haven. (Yay another cut-scene convo thing!) It is time to venture to Val Royeaux.

You once again have to select Val Royeaux from the war-table to go there (as you do with any new place you want to go to.) When arriving there you'll immediately go into a cut-scene with a scout. After that is over you'll walk in a straight line for like ten feet (once you get into the crowd by the statues of the lions) another cut-scene triggers with the head of the Templar order. After this disturbing change of events go to your left. An arrow will fly at you from nowhere. Look at what the message says and then go to the dock area to find a red handkerchief, then to the cafe to find the next and finally use the fast travel station to go up one level and find another on a balcony. Before you leave this map however make sure you talk to the courier that is waiting for you with a message from a Madame de Fer. 

Now you can leave the map (unless you want to explore <-there's a lot of shops here.) Go to the mini-maps that have now opened up on your world map. One holds Sera the crass-elf-archer and then other holds Vivenne the first enchanter of Orlais. (Otherwise known as Madame de Fer.) Recruit them if you wish. 


Sera


Vivenne


Go back to Haven once you are done and after a cut-scene with the council (chose the bottom left corner option of you need to chose soon to gain approval with Cassandra)  Leliana will pull you aside and tell you of her worry that the Wardens have disappeared. Once all the cut-scenes are done go just outside the Chantry to find Krem waiting for you with a message from Iron Bull, Captain of Bulls Chargers. (He is one of my personal favorite characters and a really good fighter so I highly recommend getting the Chargers) He (Krem) will tell you that they're waiting for you to see how they fight on the Storm Coast (time for a new area again!) Go inside once the conversation is over and open up the Storm Coast (costs 4 power). Right down the hill from where you first are is Bull and his chargers. Go recruit them if you wish, if not go back to the Hinterlands because you have one more person to get. 

Iron Bull


Krem


Okay (whew long post, my poor fingers) the last person you have left to grab is Blackwall the warden. Leliana didn't know exactly where he was on the Hinterlands map, but I do! Go back to the crossroads and travel up by where Corporal Vale is, but continue up the mountain path. Up here establish another camp and then continue back up the path to the left. You have now reached Lake Luthis( I really don't know if I spelled that right -_-) Go across the lake (but don't walk in the water because you can die that way if it gets too deep) Off to the right there is a house with SURPRISE one of your last companions; Blackwall. You trigger a cut-scene and some fighting once you get there but when that is all said and done a small conversation with the Warden himself will let you either recruit him or you have the option to say no. (I like to recruit everyone and he is a good tank.) With that ends your recruitment of companions. (The other two just kind of come to you. That is later on down the road however.) 


Blackwall

Wednesday, February 4, 2015

Haven Map

Haven
Remember: SPEAK to your war council members as well as your team members. You need their help!!!

After a cut-scene it's time to explore Haven a bit (plus people there have some quests) Starting from the Chantry go directly forward and speak with Threnn. After getting her quest for weapons go left and up the hill. You'll reach a clearing surrounded by three houses/huts and Solas on the side with steps. In the middle house is Adan, he has another quest for you. Plus there is a codex and a loot chest inside. Within the other two house things lie codex and loot items. When your down continue down the stairs behind Solas and into the pub that lies along the right side of the path. On the outside of the pub there'll be a codex. Inside there is 2+: One is a book on a table by a door, the is a sheet of paper across from the bar. (the plus comes from any songs you might here which will update the "Patron of the Arts" quest.

When done head out and go right down the path. Varric is a short distance away beside a campfire. Talk with him about red lyrium to get his approval quest. In fact the only thing that I have found that results in his disapproval is the "Orisinos fate made no sense" and "I'm fine" when he asks if you're alright. Other than that nothing you say/ask has any effect (except "Too many people died, I'm just glad to be alive, I can barely keep up and This is all bull" options which  all result with slight approval.) When done head down the steps.


If you want more loot go left to a clearing with a trebuchet and some soldiers. This also contains some materials and 2 codex entries. If you don't want more loot (who DOESN'T want more loot though?) go through the large gate doors that will take you outside of Haven. When they open you'll see a training ground to the right and the blacksmith to the left. Go left. The blacksmith (Harriett) has 2 quests for you to do there that involve crafting and modifying armor. When finished head up the path to the left all the while clicking in your left stick which will help you find materials (ie iron, elfroot) to craft with and the quest Threnn sent you on. You'll reach a bridge which has a codex, coin purse and a bag of loot. Jump onto the wall above the bag of loot and then jump onto the near-by mountain top. Head up and over the mountain and to the quest marker on your map. When your done exploring you'll find the logging stand you are looking for in a grove of trees in front of a gate . Mark it and then head through the gate and into the house in front of you. Click in the left stick to find notes for Adan and then head out of the house and onto the path. Go left and forward to make your way back to Haven. Turn in your quests and go into the Chantry. A cut-scene will happen and with that you're finished with the map of Haven. When you can speak with Josephine on the 2nd door on the left. A small cut-scene will happen with a disgruntled noble but when it ends you'll be able to turn in any loot that might help Minaeve (the researcher person)


The quests I talked about are:


Prologue of Dragon Age Inquisiton

First off let me just say: HALLELUJAH!!!  I have been waiting for this game for a total of 3 years (since Dragon Age 2 came out.) So of COURSE I got the special edition version and paid more money than I should of. (To be fair I paid all the monies in advance as an extremely belated birthday present to myself <- I waited for 6 months)

To say that I was just a tad excited would be a lie. In fact when Bioware first announced it I was more like this:


ANYWHO..........


Now, don't get me wrong, I am not a biased fan. DA 2 was complete crap. Too scripted, same maps over and over again........ In fact if you want a truly accurate review.....le clicky here. Angry Joe always takes the words right out of my mouth. I did my first play-through and it took me probably around 70-ish hours to complete and that wasn't even half of it..........there was a lot of little side-quests that I didn't do. 


NOW ONTO THE PROLOGUE!!!!
I have TWO tips for the prologue: A) Question everything. Just highlight the "Investigate options" they will give you more detail and submerge you in the story just a little more. B) Click left stick. This will find you bookoo amounts of materials to craft with and loot from boxes, corpses, etc. When you do this orange dots appear on your HUD circle in the lower right hand of the screen.


After the customization to your character you go into a cut-scene. During this cut-scene you've the ability to chose what you will for dialogue options. Pick what you will. I normally go with the "emotional" or "nice" responses because that is my play style and I really don't like it when fictional characters hate me. (Except for Sebastian in DA II <- freaking butt-hole that guy was.)

When Cassandra takes you outside for the first time chose the "I'll help" option (the top one on the right) to gain approval with her. Continue up the path a bit and you'll get to a part when you're introduced to the weapon of your choosing (bow, daggers etc) chose the "I'll disarm" option (once again the top one on the right.) to gain yet another approval burst with her. Head to your destination once more, now armed! 

You will eventually get to a hill where you'll meet Varric (he is from DA II and the best character on there) and Solas (a new character.) After the introductions and another brief cut-scene you'll continue along the path learning controls for the game. After awhile you'll get to the "forward camp" where you'll get to make the first (of many) decisions. This is where I will split. The easier of two options is to Charge with the Soldiers:
You'll gain approval with Cassandra if you chose this option as you chose to go along with her.  Head up the hill and through the small encampment where soldiers are prepping to battle. Ahead is another rift, which can be closed after killing the demons that come out of it. After closing the first you have a small cut-scene convo with Captain Cullen (<-yummy) But you do this at the expense of the lives of the soldiers that charged to begin with.

or you can Take the Mountain Path:
This is the option that I normally like to chose. (You save lives in the end!) You get a slight disapproval with Cassandra but an approval rating with Varric by choosing this option. You'll climb 2 sets of ladders that head into an unused mining place. Defeat some baddies lurking there and continuing further into the cave. After passing a blue/black/snowy alcove thing on the right there'll be a room with a torch and a random loot chest and a bag of gold. Leave the room and continue on the path just a tad further (literally) as you'll reach another small alcove  with a bag of loot directly in front of you and a bag of gold on the other side of the room. Continue up and encounter some more baddies. Defeat them and go through the door.

 You'll see some bodies of scouts on the ground, but have no fear, you'll encounter more the further you go on down the path. Ahead you can see a rift with the scouts fighting the demons. Defeat the demons, close the rift and a convo happens between Cassandra, you and the head of the scouts. Chose the "It was worth the risk" option and gain slight approval with Solas. After the convo continue down the path, some ladders and down into what appears to be a giant hole in the ground. As you reach the entrance to the giant rift in the sky there'll be a body to loot in front of you. 

Prologue Cont.

Either way you chose you'll end up here. Upon going through the doorway a cut-scene happens. Then its just a small walk to the ground where you'll try to close it. SAVE before jumping down and then another cut-scene happens when you do. SURPRISE! Its a Pride Demon (level 4) fight with intermitten smaller level demons. Once the big baddie is defeated the screen will fade to black and you'll wake up in a bed at Haven. 

After a conversation with a frightened elf, loot the room to get a codex update and a box (or two if you got a special code thing with your game.) Make your way out and through the adoring crowd. Go up the steps and your your left on a post will be a song updating the "Patron of th Arts" quest. Continue left into the hut in font of you. There will be another codex update. Grab and continue into the Chantry. Inside will be several codex entries and bags of loot. (For rogues there is also a prison-like thing to loot within the first door on the left.) When you're ready, go through the door at the far end from where you entered once again triggering a cut-scene. Chose the options of "I did what I could" and "I want to help" for a slight approval(s) with Cassandra. 

This is where your screen fades to black and the prologue bit is over. For a more detailed description I have a link here that will take you to the Wiki page for this quest. 

OKAY so I am going to insert pics of the amazing characters here:


Captain Cullen


Cassandra Pentaghast


Solas


Leliana (Sister Nightingale) 


Josephine Montilyet


Varric Tethras

Le Introduction :)

Hi all! I don't know if anyone is interested in reading what I have to say or not, but I decided its therapeutic for me. (Plus I get to share my love of gaming......well just RPGs and some FPS.) I just want to take a minute to introduce myself. My name is Siarra Halstead. My husband is military (which means I have A LOT of alone time and single mom time.) I have three kiddos that I love more than anything. When they aren't demanding my attention I devote my time to gaming (because there isn't much else I'd rather be doing.) I got into gaming when my husband and I got married and he didn't want me to get a job because I was pregnant with our first. SO here I am 5 years later and it feels as if my whole world has changed (because really it has.) I am also a member of the LDS faith, which really directs my life (even if most of the time I have a hard time not swearing........because, well,  children......) WELL now that you know a little about me.....

I created this blog to maybe help others who need help in the games that I play (and really I should have done it eons ago. Because I ROCKED Elder Scrolls: Skyrim. <- Seriously I knew like every single corner of the map and all the quests (even the expansions.)) I am in no way an expert gamer though and don't claim to be the best at anything. I will just simply give my POV of how things should be done......Oh yeah......Did I mention that I was a completionist and have this inherent NEED to get ALL the achievements on Xbox? No? Well now you know my lovelies......


Let's get to gamin!!!